


|
|
|
|
|
|
|
|
|
|
version 6.5
The Caught Commands List is a page of the Runtime Explorer that enables you to add additional breaks to your code by catching calls to 4D commands.
Catching a command enables you to start tracing the execution of any process as soon as a command is called by that process. Unlike a break point, which is located in a particular project method (and therefore triggers a trace exception only when it is reached), the scope of catching a command includes all the processes that execute 4D code and call that command.
Catching a command is a convenient way to trace large portions of code without setting break points at arbitrary locations. For example, if a record that should not be deleted is deleted after you have executed one or several processes, you can try to reduce the field of your investigation by catching commands such as DELETE RECORD and DELETE SELECTION. Each time these commands are called, you can check if the record in question has been deleted, and thus isolate the faulty part of the code.
With some experience, you can combine the use of Break points and command catching.
To open the Caught Commands page:
1. Switch to the Design environment if you are not already there.
2. Choose Runtime Explorer from the Tools menu.
The Runtime Explorer can be displayed in a floating palette. In this case, the floating palette always remains displayed in the front. To do this, hold down the Shift key while selecting Runtime Explorer from the Tools menu, or press Ctrl+Shift+F9 on Windows or Command+Shift+F9 on Mac OS.
The Runtime Explorer window appears.
3. Click on the Catch tab control to display the Caught Commands List:
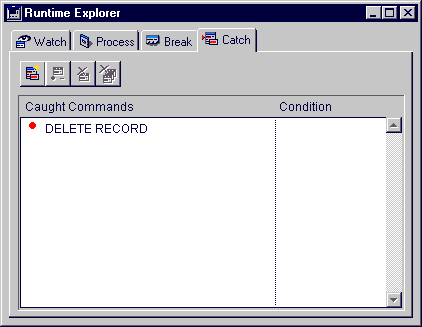
This page lists the commands to be caught during execution. It is composed of two columns:
• The left column displays the Enable/Disable status of the caught command, followed by the name of the command.
• The right column displays the condition associated with the caught command, if any.
Adding a New Command to be Caught
To add a new command:
1. Click on the Add New Catch button (first button above the list).
OR
Double-click the left mouse button in the Caught Commands list.
In both cases, a new entry is added to the list with the ALERT command as default.
The entry is set to the edit mode.

2. Enter the name of the command you want to catch.
3. Press Enter or Return to validate your choice.
OR
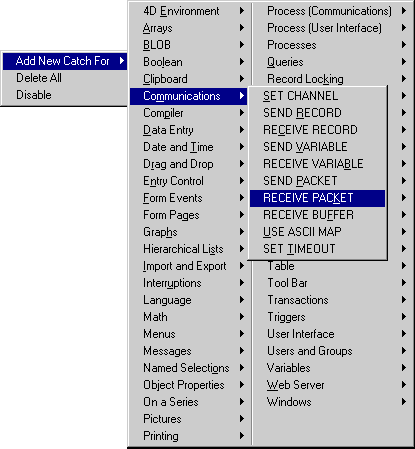
1. Press the right mouse button (Control+Click on Macintosh) to display the speed menu.
2. Select Add New Catch, then select the desired command from the command themes and names submenus. A new entry is added with the command you selected.
Editing the Name of a Caught Command
To edit the name of a caught command:
1. Select the entry by clicking it or by using the arrow keys to navigate through the list (if the current selected entry is not already in edit mode).
2. To toggle an entry between edit mode and select mode, press Enter or Return.
3. Enter or modify the name of the command.
4. To validate your changes, press Enter or Return. If name you entered does not correspond to an existing 4D command, the entry is set to its previous value. If the entry is a new one, it is reset to ALERT.
Disabling/Enabling a Caught Command
To disable or enable a caught command:
1. Select the entry by clicking it or by using the arrow keys to navigate through the list (if the current selected entry is not already in edit mode).
2. If the entry is in edit mode, press Enter or Return to switch to select mode.
3. Click on the Enable/Disable button or choose Enable/Disable the speed menu.
Shortcut: Each entry in the list may be disabled/enabled by clicking on the bullet (•). The bullet changes to a dash (–) when disabled.
Deleting a Caught Command
To delete a caught command:
1. Select the entry by clicking it or by using the arrow keys to navigate through the list (if the current selected entry is not already in edit mode).
2. If the entry is in edit mode, press Enter or Return to switch to select mode.
3. Press the Delete key or click on the Delete button.
Note: To delete all the caught commands, click on the Delete All button or chosse Delete All in the speed menu.
Setting a Condition for Catching a Command
To set a condition for catching a command:
1. Click on the entry in the right column.
2. Enter a 4D formula (expression, command call or project method) that returns a Boolean value.
Note: To remove a condition, delete its formula.
Tips
• Adding conditions to caught commands slows the execution, because the condition has to be evaluated each time an exception is met. On the other hand, adding conditions accelerates the debugging process, because it automatically skips occurrences that do not match the conditions.
• Disabling a caught command has almost the same effect as deleting it. During execution, the debugger spends almost no time on the entry. The advantage of disabling an entry is that you do not have to recreate it when you need it again.
See Also
Break List, Break Points, Debugger.
|
|
|
|
|
|
|
|
|
|