


|
|
|
|
|
|
|
|
|
|
version 6.5 (Modified)
As explained in the Source Code pane section, you set a break point by clicking in the left margin of the Source Code pane or of the Method Editor window, at the same level as the line of code on which you want to create the break.
Note: Since you can insert, modify or delete break points either in the debugger's Source Code pane or directly in the Method Editor, there is a dynamic interaction between the Method Editor and the debugger (as well as the Runtime Explorer) in regards to break points. However, temporary break points can be defined in the debugger only (see below).
In the following figure, a break point has been set, in the debugger, on the line If($vrResult>=$vrLimitValue):
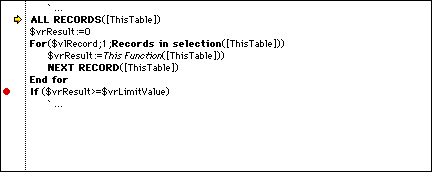
If you click again on the red bullet, the break point is deleted.
Editing a Break Point
Pressing Alt-click (Windows) or Option-click (Macintosh) in the left margin of the Source code pane or of the Method Editor window for a line of code, gives you access to the Break Point Properties window.
• If you click on an existing break point, the window is displayed for that break point.
• If you click on a line where no break point was set, the debugger creates one and displays the window for the newly created break point.
The Break Point Properties window is shown here:
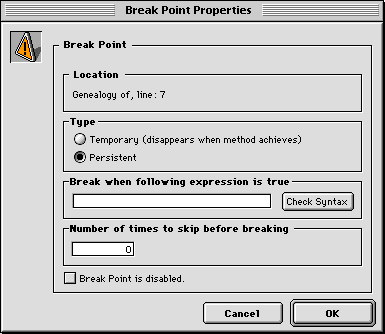
Here are the properties:
Location: This tells you the name of the method and the line number where the break point is set. You cannot change this information.
Type: By default, the debugger lets you create persistent break points, depicted by a red bullet in the source code pane of the debugger window. To create a temporary break point, select the Temporary option. A temporary break point is useful when you want to break just once in a method. A temporary break point is identified by a green bullet in the source code pane of the Debugger window. You can also set a temporary break point directly in the source code pane by clicking in the left margin while pressing Alt+Shift (Windows) or Option+Shift (Macintosh).
Note: Temporary break points can be set in the debugger only.
Break when following expression is true: You can create conditional break points by entering a 4D formula that returns True or False. For example, if you want to break at a line only when Records in selection([aTable])=0, enter this formula, and the break will occur only if there no record selected for the table [aTable], when the debugger encounters the line with this break point. If you are not sure about the syntax of your formula, click the Check Syntax button.
Number of times to skip before breaking: You can set a break point to a line of code located in a loop structure (While, Repeat, or For) or located in subroutine or function called from within a loop. For example, you know that the "problem" you are tracking does not occur before at least the 200th iteration of the loop. Enter 200, and the break point will activate at the 201st iteration.
Break Point is disabled: If you currently do not need a persistent break point, but you may need it later, you can temporarily disable the break point by editing it. A disabled break point appears as a dash (-) instead of a bullet (•) in the source code pane of the debugger window, in the Method Editor and in the Break page of the Runtime Explorer.
You create and edit break point from within the Debugger or the Method Editor window. You can also edit existing break points using the Break page of the Runtime Explorer. For more information, see the section Break List window.
See Also
Break List, Catching Commands, Debugger, Source Code Pane.
|
|
|
|
|
|
|
|
|
|