


|
|
|
|
|
|
|
|
|
|
version 2004 (Modified)
Arrays are language objects—you can create and use arrays that will never appear on the screen. However, arrays are also user interface objects. The following types of Form Objects are supported by arrays:
• Pop-up/Drop-down List
• Combo Box
• Scrollable Area
• Tab Control
• List box
While you can predefine these objects in the Design Environment Form Editor using the Default Values button of the Property List window (except for the List box) , you can also define them programmatically using the arrays commands. In both cases, the form object is supported by an array created by you or 4D.
When using these objects, you can detect which item within the object has been selected (or clicked) by testing the array for its selected element. Conversely, you can select a particular item within the object by setting the selected element for the array.
When an array is used to support a form object, it has then a dual nature; it is both a language object and a user interface object. For example, when designing a form, you create a scrollable area:
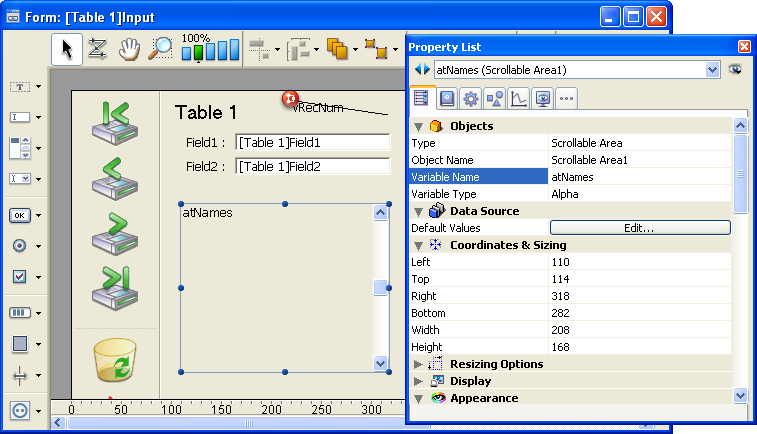
The name of the associated variable, in this case atNames, is the name of the array you use for creating and handling the scrollable area.
Notes:
• You cannot display two-dimensional arays or pointer arrays.
• The management of List box type objects (which may contain several arrays) entails many specific aspects. These particularities are covered in the Management of List Box objects section.
Example: Creating a drop-down list
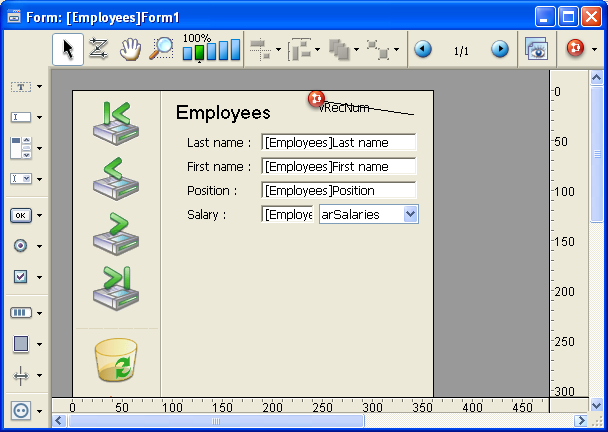
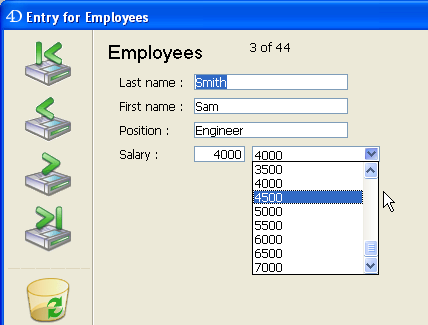
The following example shows how to fill an array and display it in a drop-down list. An array arSalaries is created using the ARRAY REAL command. It contains all the standard salaries paid to people in a company. When the user chooses an element from the drop-down list, the [Employees]Salary field is assigned the value chosen in the User or Custom Menus environment.
Create the arSalaries drop-down list on a form
Create a drop-down list and name it arSalaries. The name of the drop-down list should be the same as the name of the array.
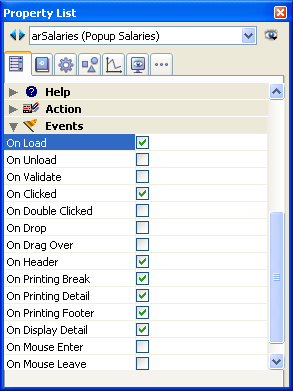
Initializing the array
Initialize the array arSalaries using the On Load event for the object. To do so, remember to enable that event in the Property List window, as shown:
Click the Object Method button and create the method, as follows:
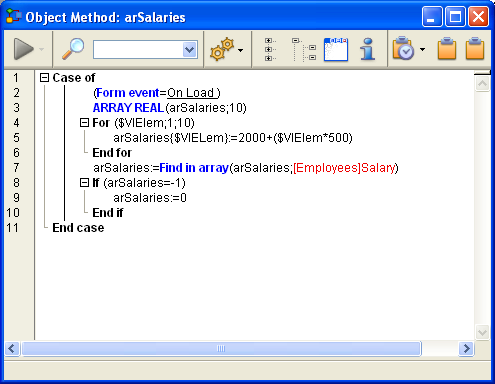
The lines:
   ARRAY REAL(arSalaries;10)
   For($vlElem;1;10)
      arSalaries{$vlElem}:=2000+($vlElem*500)
   End for
create the numeric array 2500, 3000... 7000, corresponding to the annual salaries $30,000 up to $84,000, before tax.
The lines:
   arSalaries:=Find in array(arSalaries;[Employees]Salary)
   If (arSalaries=-1)
      arSalaries:=0
   End if
handle both the creation of a new record or the modification of existing record.
• If you create a new record, the field [Employees]Salary is initially equal to zero. In this case, Find in array does not find the value in the array and returns -1. The test If (arSalaries=-1) resets arSalaries to zero, indicating that no element is selected in the drop-down list.
• If you modify an existing record, Find in array retrieves the value in the array and sets the selected element of the drop-down list to the current value of the field. If the value for a particular employee is not in the list, the test If (arSalaries=-1) deselects any element in the list.
Note: For more information about the array selected element, read the next section.
Reporting the selected value to the [Employees]Salary field
To report the value selected from the drop-down list arSalaries, you just need to handle the On Clicked event to the object. The element number of the selected element is the value of the array arSalaries itself. Therefore, the expression arSalaries{arSalaries} returns the value chosen in the drop-down list.
Complete the method for the object arSalaries as follows:
   Case of
      : (Form event=On Load)
         ARRAY REAL(arSalaries;10)
         For($vlElem;1;10)
            arSalaries{$vlElem}:=2000+($vlElem*500)
         End for
         arSalaries:=Find in array(arSalaries;[Employees]Salary)
         If (arSalaries=-1)
            arSalaries:=0
         End if
      : (Form event=On Clicked)
         [Employees]Salary:=arSalaries{arSalaries}
   End case
In the User or Custom Menus environment, the drop-down list looks like this:
The following section describes the common and basic operations you will perform on arrays while using them as form objects.
Getting the size of the array
You can obtain the current size of the array by using the Size of array command. Using the previous example, the following line of code would display 5:
ALERT ("The size of the array atNames is: "+String(Size of array(atNames)))
Reordering the elements of the array
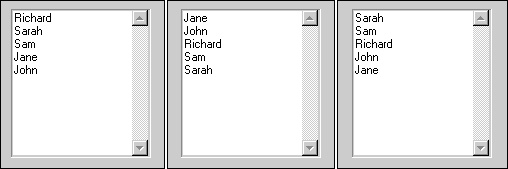
You can reorder the elements of the array using the SORT ARRAY command or of several arrays using the MULTI SORT ARRAY command. Using the previous example, and provided the array is shown as a scrollable area:
a. Initially, the area would look like the list on the left.
b. After the execution of the following line of code:
SORT ARRAY(atNames;>)
the area would look like the list in the middle.
c. After the execution of the following line of code:
SORT ARRAY(atNames;<)
the area would look like the list on the right.
Adding or deleting elements
You can add, insert, or delete elements using the commands APPEND TO ARRAY, INSERT ELEMENT and DELETE ELEMENT.
Handling clicks in the array: testing the selected element
Using the previous example, and provided the array is shown as a scrollable area, you can handle clicks in this area as follows:
      ` atNames scrollable area object method
   Case of
      : (Form event=On Load)
            ` Initialize the array (as shown further above)
         ARRAY TEXT (atNames;5)
            ` ...
      : (Form event=On Unload)
            ` We no longer need the array
         CLEAR VARIABLE(atNames)

      : (Form event=On Clicked)
         If (atNames#0)
            vtInfo:="You clicked on: "+atNames{atNames}
         End if
      : (Form event=On Double Clicked)
         If (atNames#0)
            ALERT ("You double clicked on: "+atNames{atNames}
         End if
   End case
Note: The events must be activated in the properties of the object.
While the syntax atNames{$vlElem} allows you to work with a particular element of the array, the syntax atNames returns the element number of the selected element within the array. Thus, the syntax atNames{atNames} means "the value of the selected element in the array atNames." If no element is selected, atNames is equal to 0 (zero), so the test If (atNames#0) detects whether or not an element is actually selected.
Setting the selected element
In a similar fashion, you can programmatically change the selected element by assigning a value to the array.
Examples
      ` Selects the first element (if the array is not empty)
   atNames:=1

      ` Selects the last element (if the array is not empty)
   atNames:=Size of array(atNames)

      ` Deselects the selected element (if any) then no element is selected
   atNames:=0

   If ((0<atNames)&(atNames<Size of array(atNames))
         ` If possible, selects the next element to the selected element
      atNames:=atNames+1
   End if

   If (1<atNames)
          `  If possible, selects the previous element to the selected element
      atNames:=atNames-1
   End if
Looking for a value in the array
The Find in array command searches for a particular value within an array. Using the previous example, the following code will select the element whose value is "Richard," if that is what is entered in the request dialog box:
   $vsName:=Request("Enter the first name:")
   If (OK=1)
      $vlElem:=Find in array (atNames;$vsName)
      If ($vlElem>0)
         atNames:=$vlElem
      Else
         ALERT ("This is no "+$vsName+" in that list of first names.")
      End if
   End if
Pop-up menus, drop-down lists, scrollable areas, and tab controls can be usually handled in the same manner. Obviously, no additional code is required to redraw objects on the screen each time you change the value of an element, or add or delete elements.
Note: To create and use tab controls with icons and enabled and disabled tabs, you must use a hierarchical list as the supporting object for the tab control. For more information, see the example for the New list command.
Handling combo boxes
While you can handle pop-up menus, drop-down lists, scrollable areas, and tab controls with the algorithms described in the previous section, you must handle combo boxes differently.
A combo box is actually a text enterable area to which is attached a list of values (the elements from the array). The user can pick a value from this list, and then edit the text. So, in a combo box, the notion of selected element does not apply.
With combo boxes, there is never a selected element. Each time the user selects one of the values attached to the area, that value is put into the element zero of the array. Then, if the user edits the text, the value modified by the user is also put into that element zero.
Example
      ` asColors Combo Box object method
   Case of
      : (Form event=On Load)
         ARRAY STRING(31;asColors;3)
         asColors{1}:="Blue"
         asColors{2}:="White"
         asColors{3}:="Red"
      : (Form event=On Clicked)
         If (asColors{0}#"")
               ` The object automatically changes its value
               ` Using the On Clicked event with a Combo Box
               ` is required only when additional actions must be taken
         End if
      : (Form event=On Data Change)
            ` Find in array ignores element 0, so returns -1 or >0
         If (Find in array(asColors;asColors{0})<0)
               ` Entered value is not one the values attached to the object
               ` Add the value to the list for next time
            APPEND TO ARRAY(asColors;asColors{0})
         Else
               ` Entered value is among the values attached to the object
         End if
   End case
See Also
Arrays, Grouped Scrollable Areas.
|
|
|
|
|
|
|
|
|
|