


|
|
|
|
|
|
|
|
|
|
version 2004 (Modified)
Compatibility note: Grouped scrollable areas can still be used in 4th Dimension; however, starting with version 2004 they can be replaced by List box type objects. For more information about this, refer to the Overview of List boxes section.
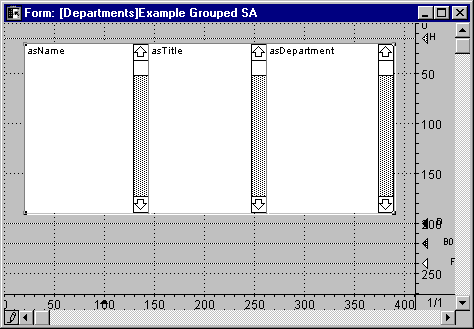
You can group scrollable areas for display in a form. When several scrollable areas are grouped, they act as one scrollable area. Each scrollable area can have its own font and style; however, we recommend that you use the same font height (which depends on the font and font size) for each column. When displayed during data entry, only the frontmost scrollable area displays a scroll bar. Following are three scrollable areas grouped together in the Design environment:
Here are some tips on creating grouped scrollable areas:
• Make sure that all the arrays have been given the same size (number of elements).
• Use the same font size for each area.
• Make each area the same height.
• Align the tops of all the areas.
• Make sure the areas do not overlap.
• Make sure that the area on the right is in front, because the scroll bar appears on the frontmost area.
• Group the areas (using the Group menu command) to make them work as one scrollable area.
The following project method fills the three arrays and displays them on the screen:
ALL RECORDS(Employees)
SELECTION TO ARRAY([Employees]Last Name;asName;[Employees]Title;asTitle;[Departments]Name;asDepartment)
DIALOG([Departments];"Example Grouped SA")
This method uses the data in the fields of the [People] table and the [Departments] table. These tables are shown here:
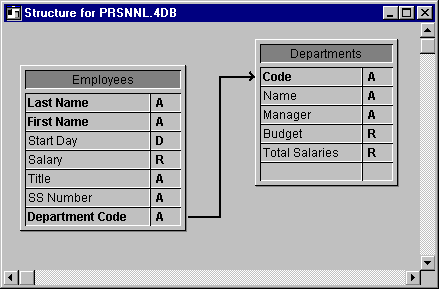
Note: The [Departments] table can be used, provided that there is an automatic relation from [People] to [Departments].
The resulting display:
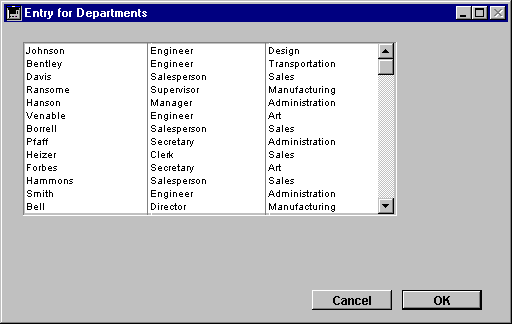
Note that only a single scroll bar is displayed; it is always on the frontmost scrollable area. This scroll bar controls the scrolling of all three arrays as if they were one. When the user clicks a line, all three areas are highlighted simultaneously. The variable associated with each scrollable area is set to the number of the line that the user clicks; only the object method for the area that is clicked executes. For example, if the user clicks the name "Bentley," asName, asTitle, and asDepartment are all set to two, but only the object method for asName executes. If you set the selected element of one of the arrays in the grouped scrollable areas, the other arrays are set to the same selected element for the next event, and the respective line in the scrollable area is highlighted.
The arrays can be sorted with the command SORT ARRAY. For example:
SORT ARRAY(asTitle;asName;asDepartment;>)
The following is the result of the sort:
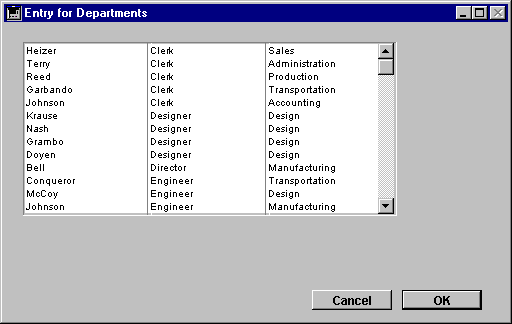
Note that the arrays were sorted based on the first argument to the SORT ARRAY command; the other two arrays were specified in order to keep the rows synchronized. The command SORT ARRAY always sorts the arrays (if several are specified) on the values of the first array and keeps the additional arrays synchronized.
Note: SORT ARRAY does not perform a multi-level sort on arrays. To show a table similar to the one above and also perform multi-level sorts (i.e., by department, then by title, then by name), use a subform in which you display the table, and then use ORDER BY.
See Also
Arrays, Arrays and Form Objects.
|
|
|
|
|
|
|
|
|
|