


|
|
|
|
|
|
|
|
|
|
version 2004 (Modified)
You can configure the operation of the 4D Web server using the parameters defined in the Web theme of the database Preferences. This section describes the parameters of the Configuration, Advanced and Options pages of this theme as well as the "Web Compatibility" section of the Application/Compatibility page.
Publishing Page
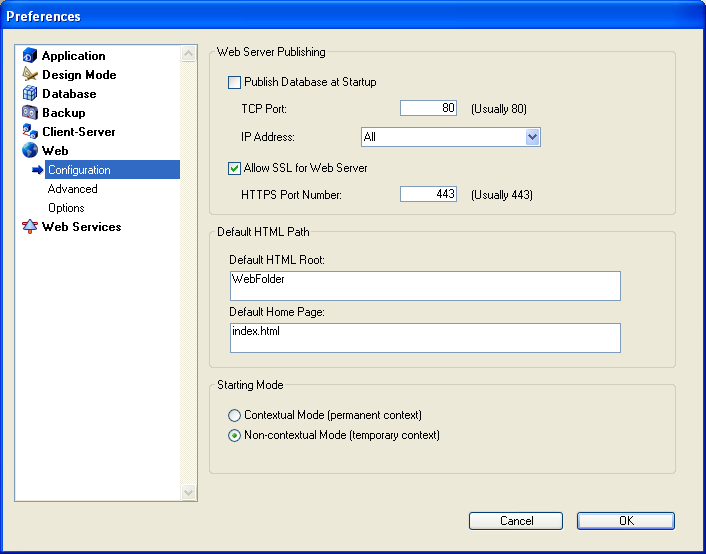
Publish Database at Startup
Indicates whether the Web server will be launched on startup of the 4D application. This option is described in the Web server configuration and connection management section.
TCP port number
By default, 4D publishes a Web database on the regular Web TCP Port, which is port 80. If that port is already used by another Web service, you need to change the TCP Port used by 4D for this database. Modifying the TCP port allows you to start the 4D Web server under Mac OS X without being the root user of the machine (see Web server configuration and connection management section).
To do so, go to the TCP Port enterable area and indicate an appropriate value (a TCP port not already used by another TCP/IP service running on the same machine).
Note: If you specify 0, 4D will use the default TCP port number 80.
From a Web browser, you need to include that non-default TCP port number into the address you enter for connecting to the Web database. The address must have a suffix consisting of a colon followed by the port number. For example, if you are using the TCP port number 8080, you will specify "123.4.567.89:8080".
WARNING: If you use TCP port numbers other than the default numbers (80 for standard mode and 443 for SLL mode), be careful not to use port numbers that are defaults for other services that you might want to use simultaneously. For example, if you also plan to use the FTP protocol on your Web server machine, do not use the TCP port 20 and 21, which are the default ports for that protocol (unless you know what you are doing). To find out the standard assignment of TCP port numbers, refer to the Appendix B, TCP port numbers section in the documentation of the 4D Internet Commands. Ports numbers below 256 are reserved for well known services and ports numbers from 256 to 1024 are reserved for specific services originated on the UNIX platforms. For maximum security, specify a port number beyond these intervals, for example in the 2000's or 3000's.
Defining the IP Address for the HTTP Requests
You can define the IP address on which the Web server must receive HTTP requests.
By default, the server responds to all IP addresses (All option).
The drop-down list automatically lists all available IP addresses on the machine. When you select a specific address, the server only responds to requests sent to this address.
This feature is for 4D Web Servers located on machines with multiple TCP/IP addresses. It is, for example, frequently the case of most Internet host providers.
Implementing such a MultiHoming system requires specific configurations on the Web server machine:
• Installing secondary IP addresses on Mac OS
To configure a MultiHoming system on Mac OS:
1. You must use Open Transport version 1.3 or later. This new feature is only available in this version of Open Transport.
2. Open the TCP/IP Control Panel.
3. Select the Manually option from the Configuration pop up menu.
4. Create a text file called "Secondary IP Addresses" and save it in the Preferences subfolder of your System folder.
Each line of the "Secondary IP Addresses" file should contain a secondary IP address and an optional subnet mask and router address for the secondary IP address.
Please check the Apple Open Transport documentation for more information.
• Installing secondary IP addresses on Windows
To configure a MultiHoming system on Windows:
1. Select the following sequences of commands:
• Windows NT: Start menu > Settings > Control Panel > Network Control panel > Protocols tab > TCP/IP Protocol > Properties button > Advanced.
• Windows 2000: Start menu > Settings > Network and Dial-up Connections > Local Area Connection > Properties button > Internet Protocol (TCP/IP) > Properties button > Advanced.
The "Advanced TCP/IP Settings" dialog box appears.
• Windows XP: Start menu > Control Panel > Network and Internet Connections > Network connections > Local Area Connection (Properties) > Internet Protocol (TCP/IP) > Properties button > Advanced... button.
The "Advanced TCP/IP Settings" dialog is displayed.
2. Click the Add.... button in the "IP Addresses" area, and add additional IP addresses.
You can define up to 5 different IP addresses. You may need to consult your systems administrator to do so. For more information, please refer to Windows documentation.
Allow SSL for Web Server
Indicates whether or not the Web server will accept secure connections. This option is described in the Using SSL Protocol section.
HTTPS Port Number
Allows you to modify the TCP/IP port number used by the Web server for secured HTTP connections over SSL (HTTPS protocol). By default, the HTTPS port number is set to 443 (standard value).
You may consider changing this port number for two main reasons:
• for security reasons — hacker attacks against Web servers are generally concentrated on standard TCP ports (80 and 443).
• under Mac OS X, in order to allow "standard" users to launch the Web server in a secured mode — under Mac OS X, the use of TCP/IP ports reserved for Web publications (0 to 1023) requires specific access privileges: only the root user can launch an application using these ports. In order for standard users to be able to launch the Web server, one solution is to modify the TCP/IP port number (see the Web server configuration and connection management section).
You can pass any valid value (in order to avoid access restrictions under Mac OS X, you should pass a value greater than 1023). For more information about TCP port numbers, refer to the "TCP port number" paragraph above.
Default HTML Root
Allows you to define the default location of the Web site files and to indicate the hierarchical level on the disk above which the files will not be accessible. This option is described in the Connection Security section.
Defining a Default Home Page
You can designate a default home page for all the browsers that connect to the database, no matter which mode (contextual or non-contextual) has been defined for the Web sessions. This page can be static or semi-dynamic.
By default, when the Web server is launched for the first time, 4D creates a home page named "index.html" and puts it in the HTML root folder. If you do not modify this configuration, any browser connecting to the Web server will obtain the following page:
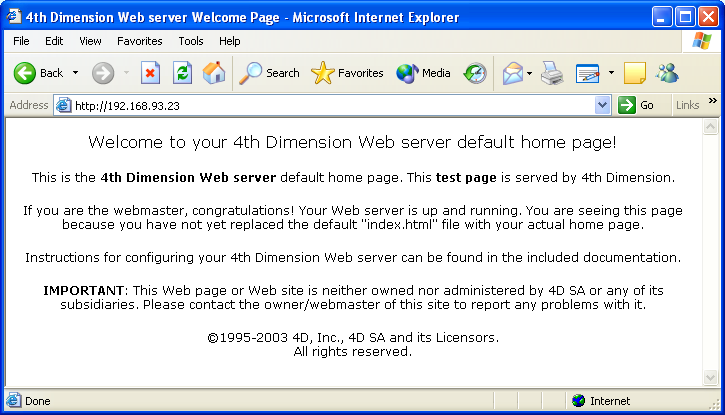
To modify the default home page, simply replace it in the database root folder with your own "index.html" page or enter the relative access path of the page that you want to define in the "Default Home Page" entry area.
The access path must be set up in relation to the default HTML root folder.
In order to ensure multi-platform compatibility of your databases, the 4D Web server uses particular writing conventions to define access paths. The syntax rules are as follows:
• folders are separated by a slash ("/")
• the access path must not end with a slash ("/")
• to "go up" one level in the folder hierarchy, enter ".." (two periods) before the folder name
• the access path must not start with a slash ("/")
For example, if you want the default home page to be "MyHome.htm", and it is located in the "Web" folder (itself located in the default HTML root folder of the database), enter "Web/MyHome.htm".
Note: You can also define a default home page for each Web process by using the routine SET HOME PAGE.
If you do not specify a default custom home page, the operation of the Web server will differ depending on the startup mode:
• If the Web server starts up in non-contextual mode (standard mode), the On Web Connection Database Method is called. It's up to you to process the request procedurally.
• If the Web Server starts up in contextual mode, the current menu bar — by default, menu bar number 1 — is sent as the home page, as in previous versions of 4D.
Starting Mode
Allows you to define the mode in which the Web server will be started. This option is described in the Using the Contextual Mode section.
Reuse Temporary Contexts (only visible with 4D Client)
Allows you to optimize the operation of the 4D Client Web server by reusing Web processes created for processing previous Web requests. In fact, the Web server of 4D Client needs a specific Web process for the handling of each Web request; when necessary, this process connects to the 4D Server machine in order to access the data and database engine. It then generates a temporary context using its own variables, selections, etc. Once the request has been dealt with, this process is killed.
When the Reuse Temporary Contexts option is checked, 4D maintains the specific Web processes created on 4D Client and reuses them for subsequent requests. By removing the process creation stage, Web server performance is improved.
In return, you must make sure in this case to systematically initialize the variables used in 4D methods in order to avoid getting incorrect results. Similarly, it is necessary to erase any current selections or records defined during the previous request.
Advanced page
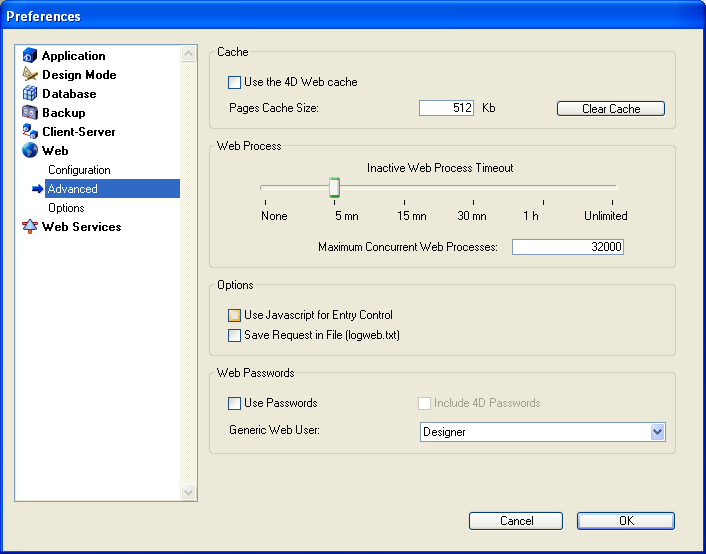
Cache for Static Pages
The 4D Web Server has a cache that allows you to load static pages, GIF images, JPEG images (<128 kb) and style sheets (.css files) in memory, as they are requested.
Using the cache allows you to significantly increase the Web server's performance when sending static pages.
The cache is shared between all the Web processes. You can set the size of the cache in the Preferences. By default, the cache of the static pages is not enabled. To activate it, simply check the Use the 4D Web cache option.
You can modify the size of the cache in the Pages Cache Size area. The value you set depends on the number and size of your Web site's static pages, as well as the resources that the host machines has at its disposal.
Note: While using your Web database, you can check the performance of the cache by using the routine WEB CACHE STATISTICS. If, for example, you notice that the cache's rate of use is close to 100%, you may want to consider increasing the size that has been allocated to it.
The /4DSTATS and /4DHTMLSTATS URLs allow you to also obtain information about the cache's state. Please refer to section Information about the Web Site.
Once the cache has been enabled, the 4D Web server looks for the page requested by the browser first in the cache. If it finds the page, it sends it immediately. If not, 4D loads the page from disk and places it in the cache.
When the cache is full and additional space is required, 4D "unloads" the oldest pages first, among the least demanded ones.
Clearing the Cache
At any moment, you can clear the cache of the pages and images that it contains (if, for example, you have modified a static page and you want to reload it in the cache).
To do so, you just have to click on the Clear Cache button. The cache is then immediately cleared.
Web Process Timeout
Allows you to define the timeout for the Web connection processes (contextual mode only). This option is described in the Using the Contextual Mode section.
Defining the Maximum Number of Web Processes
This option indicates the strictly high limit of Maximum Concurrent Web Processes of any type (contextual, non-contextual or belonging to the"pool of processes") that can be simultaneously open on the server. This parameter allows prevention of 4D Server saturation as the result of massive number of requests or an excessive demand of contexts creation.
By default, this value is 32000. You can set the number anywhere between 10 and 32000.
When the maximum number of concurrent Web processes (minus one) is reached, 4D no longer creates new processes and sends the following message "Server unavailable" (status HTTP 503 – Service Unavailable) for each new request.
How to determine the right value?
In theory, the maximum number of Web processes is the result of the following formula: Available memory/Web process stack size.
Another solution is to visualize the information on Web processes displayed in the Runtime Explorer: the current number of Web processes and the maximum number reached since the Web server boot are indicated.
About the Pool of Web Processes
The "pool" of Web processes allows increasing the reactivity of the Web server in the non-contextual mode. This reserve is sized by a minimum (0 by default) and a maximum (10 by default) of processes to recycle. These processes can be modified using the SET DATABASE PARAMETER command. Once the maximum number of Web processes has been changed, if this number is inferior to the superior limit in the "pool", this limit is lowered to the maximum number of Web processes. The maximum number of Web processes can also be defined using the SET DATABASE PARAMETER command.
Using Javascript for Data Entry Controls
When this option is checked, in contextual mode a part of the data entry controls can be done on the browsers by using automatic Javascripts.
On the browser, the data entry controls and the data types (fields or variables) to which they can be applied are as follows:
• minimum value (for numeric values)
• maximum value (for numeric values)
• mandatory value (for numeric and alphanumeric values)
Generated Javascripts, which are small in size, display alert dialog boxes without preventing the user from accepting a data entry (it is still 4D's responsibility).
Actually, if a data entry area contains an incorrect value, an alert message is displayed on the browser when the user clicks on a button (OK, Cancel, etc.):
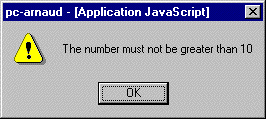
Once the alert dialog box is validated, if the user clicks a second time on the button, the button's action is then taken into account.
The complete data entry control is done on the Web server, in User and Custom Menus mode.
Save Request in File (logweb.txt)
This option enables you to generate a log of requests sent to the Web server in the form of a CLF text file. This option is described in the Information about the Web Site section.
"Passwords" area
Configuration of Web site access protection using passwords. This option is described in the Connection Security section.
Options page
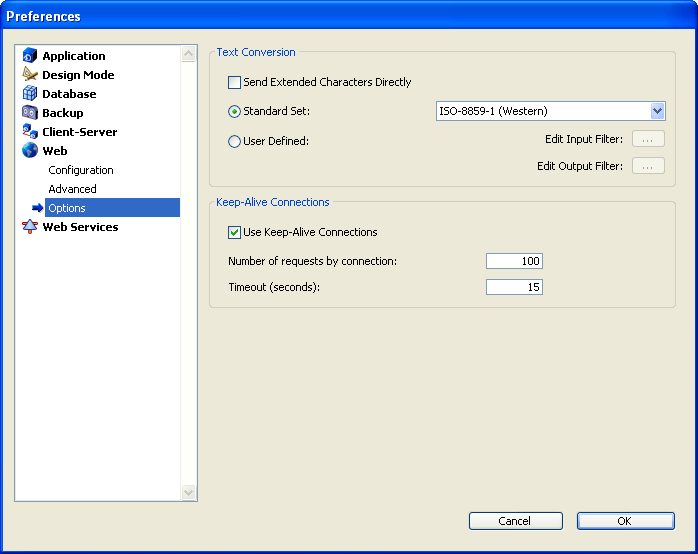
Directly Sending Extended ASCII Characters
By default, the 4D Web server converts the extended ASCII characters in the dynamic and static Web pages according to HTML standards before sending them. They are then interpreted by the browsers.
You can set the Web server so that the extended ASCII characters are sent "as is", without converting them into HTML entities. This option has shown a speed increase on most foreign operating systems (especially the Japanese system).
To do this, check the Send Extended Characters Directly option.
Character Sets
The Standard Set drop-down list allows you to define the set of characters to be used by the 4D Web server.
You can also define a customized set of characters by modifying the ASCII character conversion tables (Web filters) for both input and output of data.
To do this, check the User Defined radio button. This parameter is equivalent to selecting the "x-user-defined" set of characters.
The buttons associated with Edit Input Filter and Edit Output Filter are now enabled. The input filter interprets the characters sent by the browser to 4D Web server. The output filter interprets the characters sent by 4D Web server to the browser.
Click the button that corresponds to the filter that you want to modify.
Input filter interprets characters sent by the browser to the 4D Web server and Output filter interprets characters sent by the 4D Web server to the browser.
The following dialog box appears:
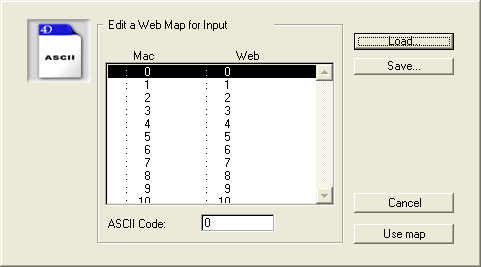
In the scrollable area, look for and click on the Mac character that you want to filter.
In the "ASCII Code" entry area, enter the character's new ASCII code.
Repeat this operation for all the characters you want to filter.
You can click on the Save... button in order to save the filter. You can then load it subsequently using the Load... button.
Click the Use map button in order to activate the Web input and/or output filter.
Keep-Alive Connections
The Web server of 4th Dimension can use keep-alive connections. The keep-alive option allows you to maintain a single open TCP connection for the set of exchanges between the Web browser and the server to save system resources and to optimize transfers.
The Use Keep-Alive Connections option enables or disables keep-alive TCP connections for the Web server. This option is enabled by default. In most cases, it is advisable to keep this option check since it accelerates the exchanges. If the Web browser does not support connection keep alive, the 4D Web server automatically switches to HTTP/1.0.
The 4th Dimension Web server keep-alive function concerns all TCP/IP connections (HTTP, HTTPS), in contextual and non-contextual mode. Note however that keep-alive connections are not always used for all 4D Web processes. In some cases, other optimized internal functions may be invoked. Keep-alive connections are useful mainly for static pages.
Two options allow you to set how the keep-alive connections work:
• Number of requests by connection: Allows you to set the maximum number of requests and responses able to travel over a connection keep alive. Limiting the number of requests per connection allows you to prevent server flooding due to a large number of incoming requests (a technique used by hackers).
The default value (100) can be increased or decreased depending on the resources of the machine hosting the 4D Web server.
• Timeout: This value defines the maximum wait period (in seconds) during which the Web server maintains an open TCP connection without receiving any requests from the Web browser. Once this period is over, the server closes the connection.
If the Web browser sends a request after the connection is closed, a new TCP connection is automatically created. This operation is not visible for the user.
Web Compatibility
The Compatibility page of the Application theme of the Preferences includes options allowing you to adjust the operation of the Web server:
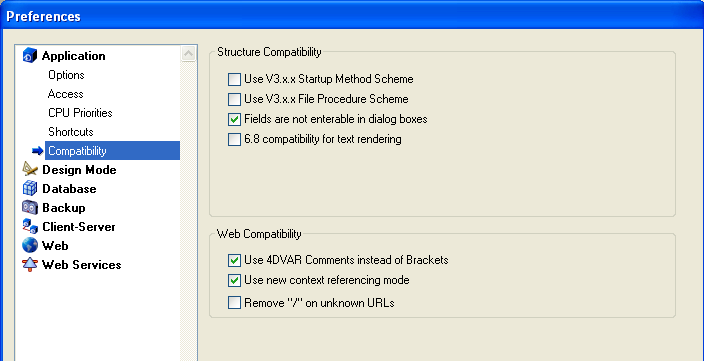
Use 4DVAR comments instead of Brackets
This option allows you to define the notation to use when inserting 4D variables on static pages.
• When the option is checked (default value), the syntax you need to use is the standard HTML notation <!--#4DVAR MYVAR--> (A space character must be inserted between 4DVAR and the variable name).
• When the option is not checked, the syntax you need to use is the notation with square brackets ([MYVAR]) — which is a proprietary solution used in former versions of the 4D Web server.
New Mode to Reference Contexts
When this option is checked (default value), in contextual mode the Web server places the current context number in the basic URL of the documents sent to the browsers.
With the previous system (option not checked), the 4D Web server sends the context number for each element of a page to the browser, which slows down processing.
This option can be unchecked for reasons of compatibility. Keep in mind that after modifying it, you must restart the database in order for the new operation to take effect.
Remove "/" on unknown URLs
In previous versions of 4th Dimension, unknown URLs (that corresponded neither to an existing page nor to a 4D special URL) were returned in the On Web Authentication and On Web Connection database methods ($1) without being preceded by the "/" character. This particularity has been removed starting with 4th Dimension 2004.
However, if you have set up mechanisms based on this particularity and wish to keep the previous behavior, you can check the Remove "/" on unknown URLs option. By default, this option is checked for converted databases and unchecked for new databases.
See Also
Connection Security, SET DATABASE PARAMETER, SET HOME PAGE, Using the Contextual Mode.
|
|
|
|
|
|
|
|
|
|