


|
|
|
|
|
|
|
|
|
|
version 2004 (Modified)
4th Dimension, 4D Server and 4D Client include a Web server that enable you to publish the data of your databases on the Web, transparently and dynamically.
This section describes the steps necessary for publication of 4D databases and for connection of browsers, as well as the process of connection management.
Conditions for publishing a 4D database on the Web
To be able to publish a 4D database on the Web using 4th Dimension, 4D Server or 4D Client, you must have the elements described below:
• The required 4D Web Extension, 4D Server Web Extension or 4D Client Web Extension licenses must be installed in your application. For more information, please refer to your 4D Product Line Installation Guide.
• Web connections are made over the network using the TCP/IP protocol. Consequently:
- You must have TCP/IP installed on your machine and correctly configured. Refer to your computer or Operating System manuals for more information.
- If you want to use SSL for network connections, make sure that requested components are correctly installed (see section Using SSL Protocol).
• After all the previous points have been checked and taken care of, you need to start the Web server from within 4D. This last point is discussed further on in this section.
Publication authorization (4D Client)
By default, any 4D Client machine can publish the database to which it is connected on the Web. However, you can control the possibility of Web publication for each 4D Client by using the 4D password system.
In fact, 4D Client Web licenses are considered as plug-in licenses by 4D Server. Therefore, in the same way as for plug-ins, you must retrict the right to use Web Server licenses to a specific group of users.
To do this, display the Groups page in the Toolbox using 4D Client (you must have suitable access authorization to modify these parameters).
Select a group in the list on the left, then check the Access option next to the Web Server line in the Plug-in distribution area:

Above: only users belonging to the "Web" group are authorized to publish their 4D Client machine as a Web server.
Configuring the Web server under Mac OS X
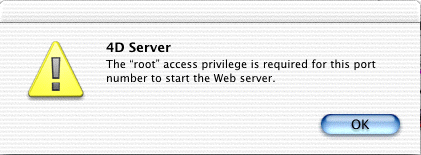
Under Mac OS X, using TCP/IP ports reserved for Web publishing requires specific access privileges: only the "root" user of the machine can launch an application using these ports.
These ports are numbers 0 to 1023. Remember that, by default, a 4D database is published on TCP port 80 in standard mode and on port 443 in SSL mode.
Once you publish a 4D database on the default TCP port without being connected as the "root" user, an alert dialog box will be displayed:
To use the Web server under Mac OS X, you have four possibilities:
• Modify the TCP port numbers used by the 4D Web server.
You must use port numbers greater than 1023, for example, port 8080 for standard mode and 8043 for SSL mode.
This operation occurs in the Preferences dialog box (see Web Server Settings section) or using the SET DATABASE PARAMETER command. In this case, it will be necessary to indicate the port number after each database connection URL (for example, http://www.mydatabase.com/pages/mypage.html:8080) and https://www.mydatabase.com/pages/payment.html:8043.
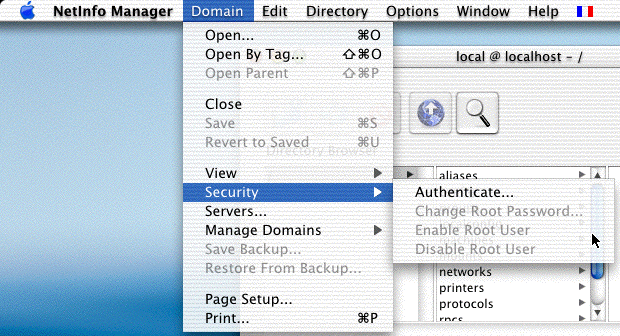
• Logging on as the "root" user
By default, the "root" user is not enabled on a machine running Mac OS X. You must first enable it and then log in with this user name.
Enabling a "root" user takes place using the NetInfo Manager utility provided by Apple and installed in the Applications:Utilities folder.
Once the utility has been launched, choose the Security command in the Domain menu, then the Enable root user option. You must have first identified the machine administrator using the Authenticate... command, located in the same menu (enter the shortened name and the administrator password).
For more information on this operation, refer to the Mac OS X documentation.
Once the "root" user has been created, you must close the session (Apple menu) and then log in using the "root" user name. You can then launch the Web server on port number 80, or a 4D Web server with a secure connection.
• Port transfer
This third solution lets you publish a 4D Web database under Mac OS X without being a "root" user and without it being necessary to specify the port number behind each connection URL to the server. It is based on port transfer. The principle consists of transferring, at the system level, the requests received on the standard TCP port number (80) to one specified in the 4D database (which must be greater than 1023). Note that this tip will not work with secured connections (the TCP port 443 is not modifiable).
To carry out this operation, you must connect as a "root" user, start the Terminal and use Unix commands.
To set up the port transfer under Mac OS X (assuming that your IP address is 192.168.93.45):
1. Open a session as a root user (see the previous paragraph).
2. Start the Terminal program.
This program is found in the Applications:Utilities folder.
3. Enter "su" ("substitute user" special account) followed by the root user password.
4. Enter the following command:
ipfw add 400 fwd 192.168.93.45,8080 tcp from any to 192.168.93.45 80
Of course, you must replace "192.168.93.45" with your own IP address.
The figure 400 is the reference number of this operation.
5. Quit the Terminal program.
6. Start your 4D application as a standard user.
7. In the Preferences of the database, set the Web publication TCP port to 8080.
From then on, Mac OSX is ready to transfer the requests received on port 80 to port 8080 instantaneously and in a manner which is invisible for the user.
To remove this mode of operation:
1. Start the Terminal program and enter:
ipfw delete 400
The requests received on port 80 will no longer be transferred to port 8080.
• Opening a temporary root session
This solution works as follows: the 4th Dimension Web server is initially launched in a "root" session that is opened for this purpose, but is closed soon after. This new feature can be used with 4th Dimension, 4D Server, 4D Client and the 4D Runtime executable applications.
Here are the details of the sequence:
1. The 4th Dimension application is executed using a classic user session.
2. When the Web server is launched on the standard port (port 80), an alert dialog box appears telling the user that the operation is not possible.
The dialog box gives the user the opportunity to modify access privileges in order to be able to launch the Web server. To do this, the user must enter an administrator name and password for the machine.
3. The user enters an administrator name and password for the machine.
Using this information, 4th Dimension can modify application access privileges and set the user session as "root".
4. The user is asked to quit and restart the application.
5. On start-up, the 4th Dimension application starts in root session.
6. If the "Publish Database at Startup" option is checked in the application Preferences, the Web server is launched on port 80.
If the "Allow SSL for Web Server" option is checked, the SSL port (443 by default) is also opened.
7. After a few moments, the root session is automatically closed and replaced with the session of the current user.
The Web server remains published and the user session continues normally.
The drawback of this mechanism is that once it is in place, you cannot stop, start and restart the Web server at will during a session. You cannot go from a standard user session to a "root" session (higher access privileges) without restarting the application. This mechanism only works on application startup.
Starting the 4D Web Server
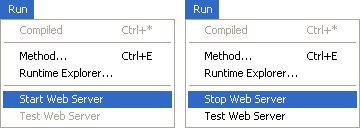
The 4D Web Server can be started in three different ways:
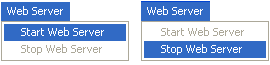
• Using the Run menu of 4th Dimension and/or 4D Client or the Web menu of 4D Server. The Web Server menu allows you to start and stop the Web Server at your convenience:
4th Dimension and 4D Client:
4D Server:
• Automatically publishing the database each time it is opened. To automatically publish a database on the Web, choose the Edit menu's Preferences... option from the main menu bar of 4D. The Preferences... window appears. Click on the Configuration page of the Web theme:
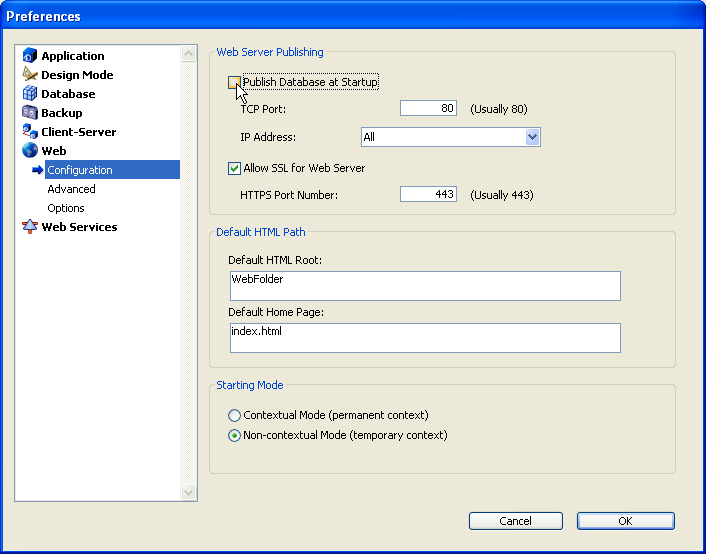
In the Web Server Publishing section, select the Publish Database at Startup check box, then click OK. Once this is done, the database will be automatically published on the Web each time you open it with 4th Dimension, 4D Server or 4D Client.
• Programmatically, by calling the command START WEB SERVER.
Tip: You do not need to quit 4D and reopen your database to start or stop publishing a database on the Web. You can interrupt and restart the Web server as many times as you want, using the Run menu or calling the commands START WEB SERVER and STOP WEB SERVER.
Testing the Web server
The Test Web Server command can be used to make sure the built-in Web server is functioning correctly (4th Dimension and 4D Client only). This command is accessible in the Run menu when the Web server is launched:
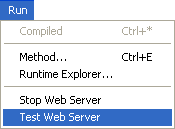
When you select this command, the home page of the Web site published by the 4D application is displayed in a window of your default Web browser:
This command lets you verify that the Web server, home page display, etc. work correctly. The page is called using the URL Localhost, which is the standard shortcut designating the IP address of the machine on which the Web browser is executed. The command takes into account the TCP publication port number specified in the application preferences.
Connecting to a 4D database published on the Web
After you have started publishing a 4D database on the Web, you can connect to it using a Web browser. To do so:
• If your Web site has a registered name (i.e., " www.flowersforever.com"), indicate that name in the Open, Address, or Location area of your browser. Then press Enter to connect.
• If your Web Site does not have a registered name, indicate the IP address of your machine
(i.e., 123.4.567.89) in the Open, Address, or Location area of your browser. Then press Enter.
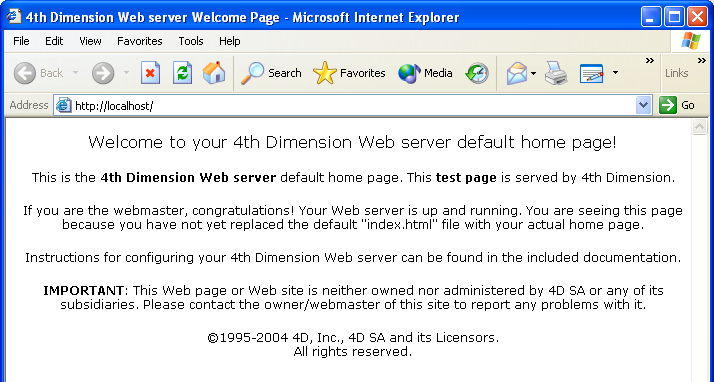
At this time, your browser should display the home page of your Web site. If you have published a database in keeping with standard configurations, you should obtain the default home page of the 4th Dimension Web server. This page lets you test the connection and the server operation.
You may also encounter one of the following situations:
1. The connection fails and you get a message such as "...the server may not be accepting connections or may be busy...".
In this case, check the following:
• Verify that the name or the IP address you entered is correct.
• Verify that 4th Dimension, 4D Server or 4D Client is up and running and has started its Web server.
• Check if the database is configured for being served on a TCP Port other than the default Web TCP Port (see situation 4).
• Check whether TCP/IP is correctly configured on both the server and browser machines. Both machines must be on the same net and subnet, or your routers must be correctly configured.
• Check your hardware connections.
• If you are not locally testing your own site, but rather attempting to connect to a Web database served on Internet or Intranet by someone else, ultimately, the message might be true: the server may be off or busy. So, retry later until you can log on, or contact the Web provider.
2. You connect, but you get an HTTP 404 "File not found" error. This means that the site home page has not be served. In this case, check that the home page actually exists at the location defined in the database Preferences (see Web Server Settings section) or using the SET HOME PAGE command.
3. You connect, but you get a Web page with the message "Menu Bar/This database is not ready to be published on the Web, you should first create a menu bar". This means that you correctly connected to the database published in contextual mode but no home page nor menu bar has been defined (in contextual mode, 4D publishes menu bar #1 as the default home page if no HTML page is specified). For more information, see the Your First Time with the Web Server section.
4. You connect, but you do NOT obtain the Web page you were expecting! This can occur when you have several Web servers running simultaneously on the same machine. Examples:
• You are running only one 4D Web database on a Windows system that is already running its own Web server.
• You are running several 4D Web databases on the same machine.
In this kind of situation, you need to change the TCP port number on which your 4D Web database is published. To do so, refer to Web Server Settings section.
Note: If your database is protected by a password system, you may have to enter a valid user name and password (for more information, refer to section Connection Security).
Web Process management
Various 4D processes support Web publication of databases and connection to browsers. This paragraph describes these processes as well as their characteristics.
Web Server Process
The Web Server process runs and executes when the database is being published as a Web site.
In the Process page of the Runtime Explorer window shown here, the Web Server process is the fifth process that is running and executing:
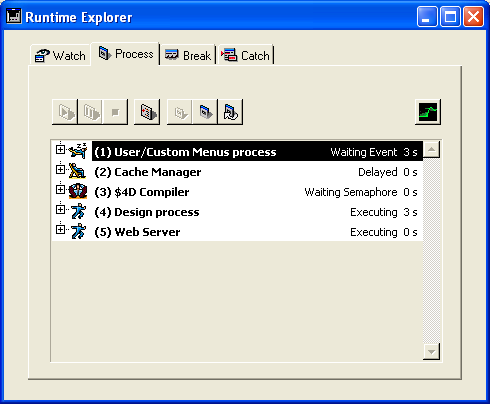
This is a 4D kernel process; you cannot abort this process using the Abort button. Also, you cannot attempt interprocess communication using commands such as CALL PROCESS. Note that the Web Server process does not have any user interface components (windows, menus, and so on).
You can start the Web Server process in the following ways:
• Choose Start Web Server in the Web Server menu of 4D Server or the Run menu of 4th Dimension/4D Client.
• Call the 4D command START WEB SERVER.
• Open a database whose Publish Database at Startup Preference is checked.
You can stop running the Web Server process in the following ways:
• Choose Stop Web Server from the User environment Web Server menu of 4D Server or the Run menu of 4th Dimension/4D Client.
• Call the 4D command STOP WEB SERVER.
• Quit the database being currently published.
The purpose of the Web Server process is only to handle Web connection attempts. Starting the Web Server process does not mean that you open an actual Web connection, it just means that you allow Web users to initiate Web connections. Stopping the Web Server process does not mean that you close currently running Web connection processes (if any), it just means that you no longer allow Web users to initiate new Web connections.
If there are open Web connection processes when you stop the Web Server process, each of these processes continues executing normally.
Consequently, a delay time can be necessary to complete the termination of the Web Server process.
Web Connection Processes
Each time a Web browser attempts to connect to the database, the request is handled by the Web Server process, which performs the following steps:
• First, it creates one or several temporary local 4D processes called Web Processes to evaluate and manage the connection with the Web browser.
Note: These temporary processes manage every HTTP request. They execute quickly and then aborted or delayed. For the Web server to be reactive in non-contextual mode, 4D freezes this "pool" of Web processes for 5 seconds and reuses them to execute any possible future HTTP queries. You can customize this behavior using the command SET DATABASE PARAMETER.
• If the request does not require that a context be created, the Web process handles the processing of the request and sends a response (if necessary) to the browser. The temporary process is then aborted or delayed (see above).
• If the request requires that a context is created, it checks to verify that there are available resources for the new connection. If it is not the case, it sends the following message to the Web browser: "This database has not been setup for the Web yet."
If the Web connection is initiated successfully, then a Web Connection process is started. This is the process that will handle the entire Web session for that connection. The Process list shown here displays the Web connection process "Web Connection# 152142900," started after a Web browser connection has been initiated:

Note that the sixth process, which was started then aborted, handled the initialization of the Web connection.
Note: For more information about the context management, see the paragraph Using the Contextual Mode section.
• If during the session, the connection switches from contextual mode to non-contextual mode, the Web connection process (with an ID) is aborted.
Conversely, if during the session, the connection switches from non-contextual mode to contextual mode, a numbered Web connection process is created.
See Also
SEND HTML FILE, SET HTML ROOT, SET WEB DISPLAY LIMITS, SET WEB TIMEOUT, STOP WEB SERVER, Using SSL Protocol.
|
|
|
|
|
|
|
|
|
|