


|
|
|
|
|
|
|
|
|
|
|
version 11.3 (Modified)
The commands of this theme are dedicated to handling form objects of the List box type.
List boxes are comparable to Grouped Scrollable Areas. A list box provides all the functions of grouped scrollable areas, notably the ability to represent data in the form of columns and selectable rows. However, the list box does even more than that, including the ability to enter values, sort columns, define alternating colors, etc.
You can set up a List box completely in the 4D Form editor and can also manage it through programming. For more information on creating and setting List boxes in the Form editor as well as on their use, refer to the Design Reference manual of the 4D documentation.
Programming List box objects is done in the same way as other 4D list form objects. However, specific rules must be followed, as detailed in this section.
Note: List box objects are designed for screen interfaces only. They cannot be printed.
Data sources and principles for managing values
A list box can contain one or more columns and can be associated either with 4D arrays or a selection of records. In the case of selection type list boxes, columns are associated with fields or expressions.
It is not possible to have both types of data sources (arrays and selections) combined in the same list box. The data source is set when the list box is created in the Form editor, via the Property list. It is then no longer possible to modify it by programming.
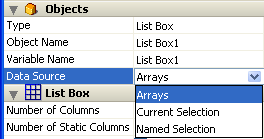
Array type list boxes
In this type of list box, each column must be associated with a one-dimensional 4D array; all array types can be used, with the exception of pointer arrays. The display format for each column can be defined in the Form editor or by using the SET FORMAT command.
Using the language, the values of columns (data entry and display) are managed using high-level List box commands (such as INSERT LISTBOX ROW or DELETE LISTBOX ROW) as well as array manipulation commands.
For example, to initialize the contents of a column, you can use the following instruction:
ARRAY TEXT(ColumnName; size)
You can also use a list:
LIST TO ARRAY("ListName"; ColumnName)
Note: When a List box object contains several columns, each related array must have the same size (same number of items) as the others, otherwise only the number of items of the smallest array will be displayed.
Warning : When a list box contains several columns of different sizes, only the number of items of the smallest array (column) will be displayed. You should make sure that each array has the same number of elements as the others. Also, if a list box column is empty (this occurs when the associated array was not correctly declared or sized using the language), the list box displays nothing.
Selection type list boxes
In this type of list box, each column can be associated with a field or an expression. The contents of each row is then evaluated according to a selection of records: the current selection of a table or a named selection.
When the current selection is the data source, any modifications made on the database side are automatically carried over to the list box and vice versa. The current selection is thus always the same in both locations. Note that the INSERT LISTBOX ROW and DELETE LISTBOX ROW commands cannot be used with selection type list boxes.
You can associate a list box column with an expression. The expression could be based on one or more fields (for example [Employees]LastName+" "+[Employees]FirstName) or simply be a formula (for example String(Milliseconds)). The expression can also be a project method, a variable or an array element.
The SET LISTBOX TABLE SOURCE command can be used to modify the table associated with the list box by programming.
Object, column and header
A List box object is composed of three separate items:
• the object itself,
• the columns,
• and the column headers.
These items can be selected individually in the Form editor. Each one has its own object and variable name and can be handled separately.
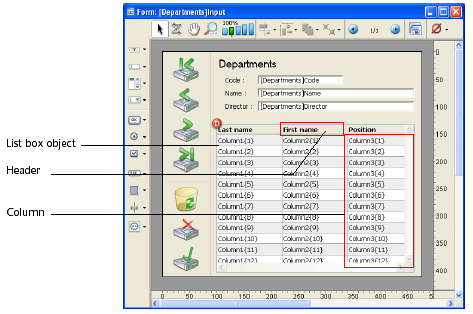
By default, columns are named Column1 to X and headers are named Header1 to X in the form, independently of the list box objects.
Each item type contains individual and shared characteristics with other items. For example, character fonts can be globally assigned to the list box object or separately to columns and headers. On the other hand, entry properties can only be defined for columns.
These rules apply to the "Object properties" theme commands that can be used with list boxes. Depending on its functionality, each command can be used with the list box, columns and/or column headers. To set the type of item on which you want to work, simply pass the name or the variable associated with it.
The following table details the scope of each command of the "Object properties" theme that can be used with list boxes:
| Object Properties commands | Object | Columns | Column headers |
| MOVE OBJECT | X | ||
| GET OBJECT RECT | X | ||
| SET FILTER | X | ||
| SET FORMAT | X | ||
| SET ENTERABLE | X | ||
| SET CHOICE LIST | X | ||
| BUTTON TEXT | X | ||
| SET COLOR | X | X | |
| SET RGB COLORS | X | X | |
| FONT | X | X | X |
| FONT SIZE | X | X | X |
| FONT STYLE | X | X | X |
| SET ALIGNMENT | X | X | X |
| Get alignment | X | X | X |
| SET VISIBLE | X | X | X |
| SET SCROLLBAR VISIBLE | X | ||
| BEST OBJECT SIZE | X | X | X |
Notes:
• All the commands of the "List Box" theme apply only to List box objects, except for the SET LISTBOX COLUMN WIDTH command (applies to object, column and header) and Get listbox column width command (applies to column and header only).
• With array type list boxes, it is possible to specify the style, font color, background color and visibility of each row separately. This is managed via arrays associated with the list box in the Property List. You can retrieve the names of these arrays by programming using the GET LISTBOX ARRAYS command.
List box and Language
Object methods
It is possible to add an object method to the list box object and/or to each column of the list box. Object methods are called in the following order:
1. Object method of each column
2. Object method of the list box
The column object method gets events that occur in its header.
SET VISIBLE and headers
When the SET VISIBLE command is used with a header, it is used on all List box object headers, regardless of the header set in the command. For example, the SET VISIBLE(*;"header3";False) instruction will hide all headers in the List box object to which header3 belongs and not simply this header.
Focus object and Self
The Focus object ("User Interface" theme) and Self ("Language" theme) functions can be used in the object method of a list box or a list box column. They return a pointer to the list box, the list box column(1) or the header variable depending on the type of form event. The following table details this functioning:
| Event | Focus object | Self |
| On Clicked | list box | column |
| On Double Clicked | list box | column |
| On Before Keystroke | column | column |
| On After Keystroke | column | column |
| On After Edit | column | column |
| On Getting Focus | column or list box (*) | column or list box (*) |
| On Losing Focus | column or list box (*) | column or list box (*) |
| On Drop | list box source | list box (*) |
| On Drag Over | list box source | list box (*) |
| On Begin Drag Over | list box | list box (*) |
| On Mouse Enter | list box (**) | list box (**) |
| On Mouse Move | list box (**) | list box (**) |
| On Mouse Leave | list box (**) | list box (**) |
| On Data Change | column | column |
| On Selection Change | list box (**) | list box (**) |
| On Before Data Entry | column | column |
| On Column Moved | list box | column |
| On Row Moved | list box | list box |
| On Column Resize | list box | column |
| On Header Click | list box | header |
| On After Sort | list box | header |
(*) When the focus is modified within a list box, a pointer to the column is returned. When the focus is modified at the overall form level, a pointer to the list box is returned. In the context of a column object method, a pointer to the column is returned.
(**) Not executed in the context of a column object method.
(1) When a pointer to a column is returned, the object pointed to depends on the type of list box. With an array type list box, the Focus object function ("User Interface" theme) returns a pointer to the column of the list box with the focus (i.e. to an array). The 4D pointer mechanism allows you to see the item number of the modified array. For example, supposing a user modified the 5th line of the column col2:
   $Column:=Focus object
      ` $Column contains a pointer to col2
   $Row:= $Column->   `$Row equals 5
For a selection type list box, the Focus object function returns:
• For a column associated with a field, a pointer to the associated field,
• For a column associated with a variable, a pointer to the variable,
• For a column associated with an expression, the Nil pointer.
SCROLL LINES
The SCROLL LINES command ("User Interface" theme) can be used with a list box. It scrolls the list box rows so that the first selected row or a specified row is displayed.
EDIT ITEM
The EDIT ITEM command ("Entry Control" theme) allows you to pass a cell of a list box object into edit mode.
Displayed line number
The Displayed line number command ("Selections" theme) functions in the context of the On Display Detail form event for a list box object.
Form events
Specific form events are intended to facilitate list box management, in particular concerning drag and drop and sort operations. For more information, refer to the description of the Form event command.
Drag and drop
Managing the drag and drop of data in list boxes is supported by the Drop position and DRAG AND DROP PROPERTIES commands. These commands have been specially adapted for list boxes.
Be careful not to confuse drag and drop with the moving of rows and columns, supported by the MOVED LISTBOX ROW NUMBER and MOVED LISTBOX COLUMN NUMBER commands.
Managing sorts
By default, the list box automatically handles standard column sorts when the header is clicked. A standard sort is an alphanumeric sort of column values, alternately ascending/descending with each successive click. All columns are always synchronized automatically.
You can forbid standard user sorts by deselecting the "Sortable" property of the list box.
The developer can set up custom sorts using the SORT LISTBOX COLUMNS command and/or combining the On Header Click and On After Sort form events (see the Form event command) and array management 4D commands.
Note: The "Sortable" column property only affects the standard user sorts; the SORT LISTBOX COLUMNS command does not take this property into account.
The value of the variable related to the column header allows you to manage additional information: the current sort of the column (read) and the display of the sort arrow.
• If the variable is set to 0, the column is not sorted and the sort arrow is not displayed;

• If the variable is set to 1, the column is sorted in ascending order and the sort arrow is displayed;

• If the variable is set to 2, the column is sorted in descending order and the sort arrow is displayed.

You can set the value of the variable (for example, Header2:=2) in order to "force" the sort arrow display. The column sort itself is not modified in this case; it is up to the developer to handle it.
Managing selections
Selections are managed differently depending on whether the list box is based on an array or on a selection.
• Selection type list box: Selections are managed by a set called "Highlight Set." This set is defined in the properties of the list box. It is automatically maintained by 4D: If the user selects one or more rows in the list box, the set is immediately updated. On the other hand, it is also possible to use the commands of the "Sets" theme in order to modify the selection of the list box via programming.
• Array type list box: the SELECT LISTBOX ROW command can be used to select one or more rows of the list box by programming.
The variable linked to the List box object is used to get, set or store selections of object rows.
This variable corresponds to a Boolean array that is automatically created and maintained by 4D. The size of this array is determined by the size of the list box: it contains the same number of elements as the smallest array linked to the columns.
Each element of this array contains True if the corresponding line is selected and False otherwise. 4D updates the contents of this array depending on user actions. Inversely, you can change the value of array elements to change the selection in the list box.
On the other hand, you can neither insert nor delete rows in this array; you cannot retype rows either.
Note: The Count in array command can be used to find out the number of selected lines.
For example, this method allows inverting the selection of the first row of the (array type) list box:
   ARRAY BOOLEAN(tBListBox;10)
      ` tBListBox is the name of the list box variable in the form
   If (tBListBox{1} = True)
      tBListBox{1}:= False
   Else
      tBListBox{1}:= True
End if |
|
|
|
|
|
|
|
|
|
|