


|
|
|
|
|
|
|
|
|
|
version 2003 (Modified)
APPEND TO LIST (list; itemText; itemRef{; sublist; expanded})
| Parameter | Type | Description | |
| list | ListRef |  | List reference number |
| itemText | String | | Text of the new list item (max. 255 characters) |
| itemRef | Longint | | Unique reference number for the new list item |
| sublist | ListRef | | Optional sublist to attach to the new list item |
| expanded | Boolean | | Indicates if the optional sublist will be expanded or |
| collapsed |
Description
The APPEND TO LIST command appends a new item to the hierarchical list whose list reference number you pass in list.
You pass the text of the item in itemText. You can pass a string or text expression of up to 255 characters. If you pass a longer value, it will be truncated.
You pass the unique reference number of the item in itemRef. Although we qualify this item reference number as unique, you can actually pass the value you want. See the "Item Reference Numbers" section below.
If you also want an item to have child items, pass a valid list reference to the child hierarchical list in sublist. In this case, you must also pass the expanded parameter. Pass True or False in this parameter so that the sublist is displayed expanded or collapsed respectively.
The list reference you pass in sublist must refer to an existing list. The existing list may be a one-level list or a list with sublists. If you do not want to attach a child list to the new item, omit the parameter or pass 0. Even though they are both optional, the sublist and expanded parameters must be passed jointly.
Tips
• To insert a new item in a list, use INSERT LIST ITEM. To change the text of an existing item or modify its child list as well as its expanded state, use SET LIST ITEM.
• To change the appearance of the new appended item use SET LIST ITEM PROPERTIES.
WARNING: If you append an item to a list currently displayed in a form or to a list that is attached to an item (through one or several levels) whose list is currently displayed in a form, you MUST call REDRAW LIST; 4D recalculates the list and displays it reflecting your changes. The rule is simple: whatever the level of the list you act on, apply REDRAW LIST to the main list, which is the list referenced by the object in the form.
Item Reference Numbers: What to do with them?
Each item of a hierarchical list has a Long Integer item reference number. This value is for your exclusive use: 4th Dimension only maintains them.
Warning: You can use any longint value as a reference number except for 0. For most of the commands in this theme, the value 0 is used to designate the last item added to the list.
Here are some tips for using unique reference numbers:
1. You do not need to uniquely identify each item (beginner level).
• First example: You programmatically build a Tab Control, for example, an address book. Since the Tab Control will return the number of the selected tab, you will probably not need more information. In this case, do not even bother about item reference numbers, pass any value (except for 0) in the itemRef parameter. Note that for an address book Tab Control, you can predefine an A, B,..., Z list in the Design environment. However, you may want to create it programmatically in order to eliminate the letters for which there are no records (e.g., no records whose key field starts with Q).
• Second example: When working with a database, you progressively build a list of keywords. You can save the list at the end of each session, using the SAVE LIST or LIST TO BLOB commands, and reload it at the beginning of each session, using Load list or BLOB to list. You display this list in a palette window. When you click on an item, you insert the clicked keyword in the current enterable area of the frontmost process. You can also use drag and drop. Anyway, what is important is that you will deal with the selected item (the one you clicked or dragged), because the Selected list items (click) and DRAG AND DROP PROPERTIES commands give you the position of the item you need to get. Using this position, you can obtain the text of the item using GET LIST ITEM. That's it. So you do not need to uniquely identify each item; you can pass any value (except for 0) in the itemRef parameter.
2. You need to partially identify the list items (intermediate level).
You use the item reference number for storing information required when you have to act on an item; this is explained in the next example. In this example, we use the item reference numbers for storing record numbers. However, we must be able to distinguish items corresponding the [Departments] records from those corresponding to the [Employees] records. Refer to the example for this command to see how this is done.
3. You need to uniquely identify the list items (advanced level).
You are programming an advanced handling of hierarchical lists, for which you absolutely need to uniquely identify each item at every level of the list. A simple way to do this is to maintain a private counter. Suppose you create a list hlList using New list. At this point, you initialize a counter vlhCounter to 1. Each time you call APPEND TO LIST or INSERT LIST ITEM, you increment this counter (vlhCounter:=vlhCounter+1), and you pass that counter as the item reference number. The trick is to not decrement the counter when you delete items—the counter can only grow. In doing so, you guarantee the uniqueness of the item reference numbers. Since item reference numbers are Long Integer values, you can add or insert an item many times in a list that has been reinitialized. (Remember, however, if you work with thousands of items, you should use a table, not a list.)
Note: If you use the Bitwise Operators, you can also use item reference numbers for storing information that fit into a Long Integer value. This means: 2 Integer values, 4-byte values or 32 Booleans values.
Why Do You Need Unique Reference Numbers?
In most cases, when using hierarchical lists for user interface purposes and when only dealing with the selected item (the one that was clicked or dragged), you will not need to use item reference numbers at all. Using Selected list items and GET LIST ITEM you have all you need to deal with the currently selected item. In addition, commands such as INSERT LIST ITEM and DELETE LIST ITEM allow you to manipulate the list "relatively" to the selected item.
Basically, you need to deal with item reference numbers when you want direct access to any item of the list programmatically and not necessarily the one currently selected in the list.
Example
Here is a partial view of a database structure:
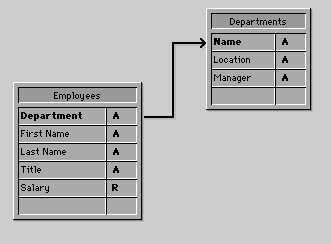
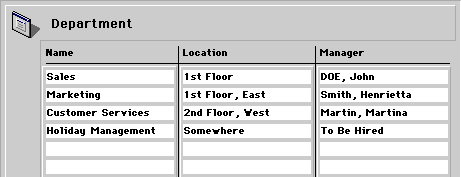
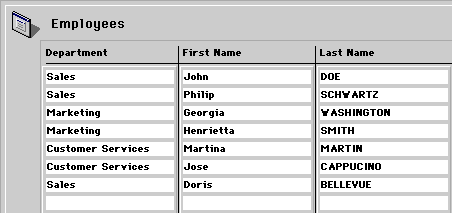
The [Departments] and [Employees] tables contain the following records:
You want to display a hierarchical list, named hlList, that shows the Departments, and for each Department, a child list that shows the Employees working in that Department. The object method of hlList is:
      ` hlList Hierarchical List Object Method

   Case of

      : (Form event=On Load)
         C_LONGINT(hlList;$hSubList;$vlDepartment;$vlEmployee)
            ` Create a new empty hierarchical list
         hlList:=New list
            ` Select all the records from the [Departments] table
         ALL RECORDS([Departments])
            ` For each Department
         For ($vlDepartment;1;Records in selection([Departments]))
               ` Select the Employees from this Department
            RELATE MANY([Departments]Name)
               ` How many are they?
            $vlNbEmployees:=Records in selection([Employees])
               ` Is there at least one Employee in this Department?
            If ($vlNbEmployees>0)
                  ` Create a child list for the Department item
               $hSubList:=New list
                  ` For each Employee
               For ($vlEmployee;1;Records in selection([Employees]))
                     ` Add the Employee item to the sublist
                     ` Note that the record number of the [Employees] record
                     ` is passed as item reference number
                  APPEND TO LIST($hSubList;[Employees]Last Name+", "+
                              [Employees]First Name;Record number([Employees]))
                     ` Go the next [Employees] record
                  NEXT RECORD([Employees])
               End for
            Else
                  ` No Employees, no child list for the Department item
               $hSubList:=0
            End if
               ` Add the Department item to the main list
               ` Note that the record number of the [Departments] record
               ` is passed as item reference number. The bit #31
               ` of the item reference number is forced to one so we'll be able
               ` to distinguish Department and Employee items. See note further
               ` below on why we can use this bit as supplementary information about
               ` the item.
            APPEND TO LIST(hlList;[Departments]Name;
                           0x80000000 | Record number([Departments]);$hSublist;$hSubList # 0)
               ` Set the Department item in Bold to emphasize the hierarchy of the list
            SET LIST ITEM PROPERTIES(hlList;0;False;Bold;0)
               ` Go to the next Department
            NEXT RECORD([Departments])
         End for
            ` Sort the whole list in ascending order
         SORT LIST(hlList;>)
            ` Display the list using the Windows style
            ` and force the minimal line height to 14 Pts
         SET LIST PROPERTIES(hlList;ala Windows;Windows node;14)

      : (Form event=On Unload)
            ` The list is no longer needed; do not forget to get rid of it!
         CLEAR LIST(hlList;*)

      : (Form event=On Double Clicked)
            ` A double-click occurred
            ` Get the position of the selected item
         $vlItemPos:=Selected list items(hlList)
            ` Just in case, check the position
         If ($vlItemPos # 0)
               ` Get the list item information
            GET LIST ITEM(hlList;$vlItemPos;$vlItemRef;$vsItemText;$vlItemSubList;$vbItemSubExpanded)
               ` Is the item a Department item?
            If ($vlItemRef ?? 31)
                  ` If so, it is a double-click on a Department Item
               ALERT("You double-clicked on the Department item "+Char(34)+$vsItemText+Char(34)+".")
            Else
                  ` If not, it is a double-click on an Employee item
                  ` Using the parent item reference number find the [Departments] record
               GOTO RECORD([Departments];List item parent(hlList;$vlItemRef)?-31)
                  ` Tell where the Employee is working and to whom he or she is reporting
               ALERT("You double-clicked on the Employee item "+Char(34)+$vsItemText+Char(34)+
                        " who is working in the Department "+Char(34)+[Departments]Name+Char(34)+
                        " whose manager is "+Char(34)+[Departments]Manager+Char(34)+".")
            End if
         End if

   End case

      ` Note: 4th Dimension can store up to 16 million records per table
      ` (precisely 16,777,215). This value is 2^24 minus one. The record number
      ` fits on 24 bits. In our example, we use bit #31 of the unused high byte for
      ` distinguishing Employees and Departments items.
In this example, there is only one reason to distinguish [Departments] items and [Employees] items:
1. We store record numbers in the item reference numbers; therefore, we will probably end up with [Departments] items whose item reference numbers are the same as [Employees] items.
2. We use the List parent item command to retrieve the parent of the selected item. If we click on an [Employees] item whose associated record number is #10, and if there is also a [Departments] item #10, the [Departments] item will be found first by List parent item when it browses the lists to locate the item with the item reference number we pass. The command will return the parent of the [Departments] item and not the parent of the [Employees] item.
Therefore, we made the item reference numbers unique, not because we wanted unique numbers, but because we needed to distinguish [Departments] and [Employees] records.
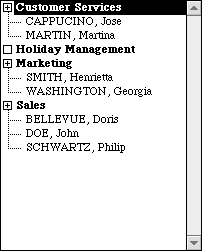
In the User or Custom Menus environments, the list will look like this:
Note: This example is useful for user interface purposes if you deal with a reasonably small number of records. Remember that lists are held in memory—do not build user interfaces with hierarchical lists containing thousands of items.
See Also
INSERT LIST ITEM, SET LIST ITEM, SET LIST ITEM PROPERTIES.
|
|
|
|
|
|
|
|
|
|